
Exploring the Optical Wonders of Ulexite in Photography
Updated: 2/4/2024
Added the ‘Polarized Filter’ and ‘Placing the Ulexite Directly on the Lens’ sections based on YouTube Comments.
What is Ulexite?
Ulexite, often called "TV rock," is a remarkable mineral with unique optical properties. Its crystalline structure channels light from one surface to the other, much like fiber optic cables. This fascinating characteristic creates the illusion of an image appearing directly on the rock’s surface, making it a fascinating material for creative exploration.
Ulexite from the side. The strands act as fiber optic cables projecting the image below onto the rock’s surface
The Inspiration
While scrolling through short videos online, I came across an intriguing clip demonstrating Ulexite’s ability to display a landscape: This rock is invisible (Action Lab Shorts). This sparked an idea: could this mineral be used as a tool in photography to capture landscapes or other scenes in a unique way? Excited by the possibilities, I purchased a piece of Ulexite to test its potential.
The internal structure of the ulexite can be seen with the surface out of focus
The Experiment
My goal was to photograph landscapes through the Ulexite, using its fiber-optic-like qualities to create an artistic effect. However, the experiment presented unexpected challenges. Unlike the video that inspired me, my initial attempts didn’t yield the same results. The light passing through the Ulexite wasn’t as clear or defined as I had hoped. I learned that the surface projection only works when the subject behind the stone is close or pressed directly to the back surface.

The landscape behind isn’t being projected through the stone.
Creating a Workaround
I decided to try turning on the camera on my phone and putting the screen directly in contact with the back side of the Ulexite. While it was hard to get the focus correct, this did provide a close approximation to what I was trying to do. The landscape in front of me was captured by the phone, which the Ulexite could then transmit to its surface. Due to the thickness of the stone and the shallow depth of field provided by my macro lens, I was able to get a semblance of depth of field between the surface and the background (on the phone screen).
Figuring out how to make it work using a phone screen
The background being displayed on my phone screen which was pressed against the back of the ulexite.
Uncovering the Technique
Through experimentation and a nagging desire to figure out how it was done in the original short I’d watched, I discovered a method to achieve the desired effect. I placed an iPad flat on a table and displayed an image on its screen; I positioned the Ulexite directly on top of the iPad. Using a macro lens, I photographed the Ulexite straight down. This setup allowed the image to appear sharp and in focus on the surface of the Ulexite, while the background on the iPad screen remained slightly out of focus due to the shallow depth of field provided by the macro lens. With a little cropping, I was able to achieve the look I was after.
The solution to how to make Ulexite photography work. Photograph it on the surface of an iPad displaying a photo you’ve already taken.
The full view from the camera

The cropped final shot
The Last Problem
Though I’d figured out the solution to photography with Ulexite, I wasn’t satisfied. In the original short, the host was holding his Ulexite in his hand in front of a live, flowing waterfall. Knowing that the only way to make Ulexite work is to put it directly into contact with something, the only solution I could come up with was to brute force it. I placed the Ulexite on top of a video on my iPad and then recorded myself sliding it around on the surface. Then I took it into some editing programs and painstakingly masked out the Ulexite and my hand from the background until only the image through the Ulexite and my hand showed. Lastly, I blurred out the original video and stacked it behind this cutout I’d made, creating the same shallow depth of field and sharp surface image that I’d achieved with the photography.
The Mask I’d Created in After Effects and Final Cut Pro
The final version (see my video above for a High Definition version of this)
The Final Secret
It turned out my memory of the original short was faulty. I had thought the video showed the Ulexite being used similarly to how I had done it. Upon further investigation, I realized the host had displayed the Ulexite on a black background, with only the image visible on its surface. Eventually, I found the original video that inspired the short: How Does Television Stone Work? (The Action Lab). In this video, the host mentions using Ulexite on a screen. However, he approaches the Ulexite from the side, gradually revealing the image displayed on top of it. This made it clear that his technique couldn’t have been the same as mine.

The Action Lab’s Version
I encourage you to watch his video and see if you can figure it out, or jump to the end of my video above where I explain the solution. Let’s just say, it’s both the same as my technique but also so much simpler.
Polarized Filter
A comment on the YouTube video by joejoe4games suggested trying to put a polarized filter on the lens. The idea is that many digital screens emit polarized light, meaning the light waves oscillate in a specific direction. A polarized filter on a camera lens blocks light aligned with its polarization axis, so if the filter is oriented perpendicular to the screen’s polarization, the screen will appear black.
Placing the ulexite on the screen should depolarize the light passing through it. This means that while the rest of the screen remains black due to the polarizing filter, the area under the ulexite could still be visible, revealing what’s underneath.

How a polarizing filter works - Image from Science World - Polarizing Filters
It’s a great idea, so let’s test it!
Below are 2 sets of images. The first is the iPad with and without the polarizing filter on the lens. The second is an LED IPS computer monitor with and without the polarizing filter.
The camera settings were unchanged between images.
iPad photographed without the polarizing filter on the lens
LED IPS Monitor without the polarizing filter on the lens
iPad photographed with the polarizing filter on the lens
LED IPS Monitor with the polarizing filter on the lens
The test sort of works on the iPad. However, even with the polarized filter, not all of the light is completely blocked. This is the darkest I could get the screen by rotating the filter. I’m using an iPad Pro 6th Generation, which has a backlit IPS XDR display. While the image on the screen does get darker, and the light through the ulexite remains as bright as without the polarizing filter, the screen isn’t completely black like I was aiming for in the video.
However, the LED IPS computer monitor (an Asus ProArt) did work! The screen appears completely black (aside from a slight edge at the top due to the camera angle), while the ulexite remains illuminated. This means the commenter’s idea worked perfectly on this type of screen.
Placing the Ulexite Directly on the Lens
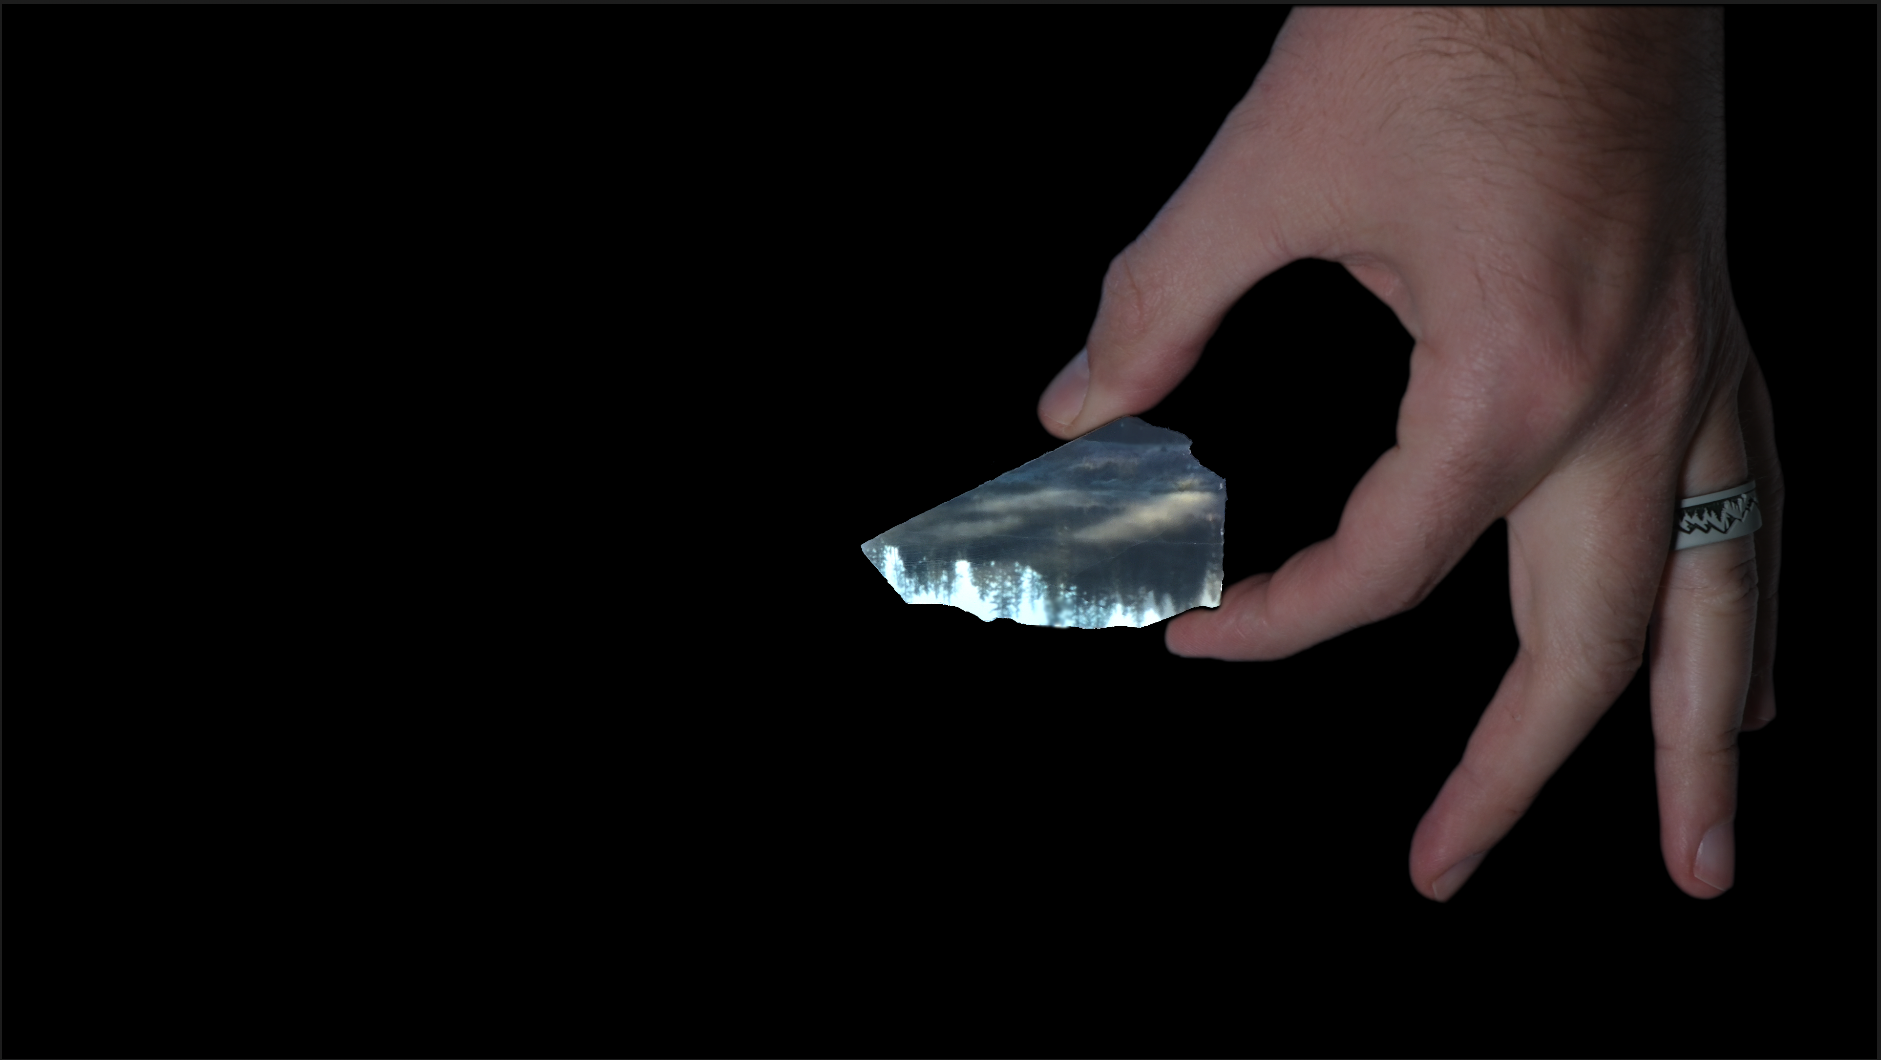
While reading through the comments, another idea came to mind—placing the ulexite directly on the camera lens to see if the image would resolve. However, no matter how much I adjusted the focus, the light passing through the ulexite never came into sharp focus.
Interestingly, it created a ring pattern that I can’t explain. Even more surprising, part of the tan color in the rings comes from my fingers holding the ulexite. My guess is that it has something to do with the optics in the lens.
A strange ring pattern forms when you put the ulexite directly on the camera lens
Let’s Connect!
Have you experimented with unique materials in photography? Share your experiences or ideas in the comments below. I’d love to hear how you’ve pushed the boundaries of creativity in your own work! Leave a comment below.